Size & weights

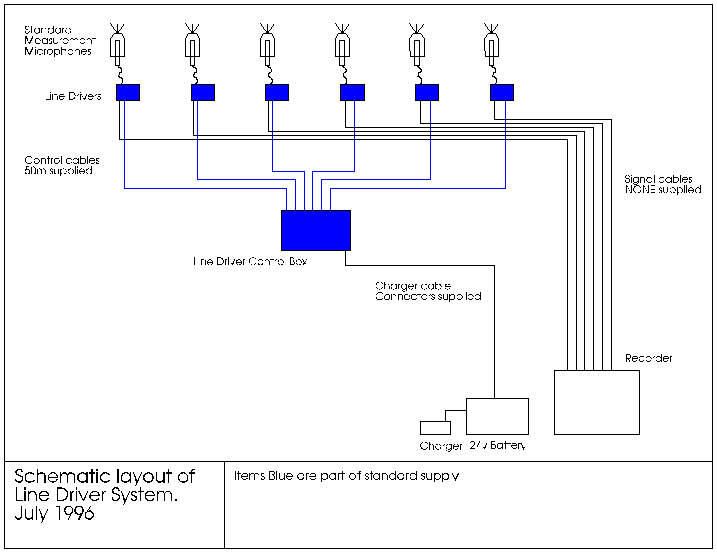
Schematic of Line-Driver System[Return
to Contents] [Top]
Description of Line-Driver System[Return
to Contents] [Top]
The Line-Driver system consists of;
Line-driver head box
Control cable
Control box
Suitable connectors
The Line-Driver system, as supplied, has two 'main' units, a control cable and suitable connectors, these permit
the user to make custom cables for their application.
The smaller ABS box, the head unit, contains the microphone power supply, signal amplifier and switching relays,
whilst the larger box, the control box, supplies control signals and charge current to the line-driver head unit.
The purpose of the system is to allow standard measurement microphones to operate at some distance from the
recorders and permit the user to switch the systems on and off, apply calibration signals etc. remotely. The system
is designed to reduce the possibility of interference by having no long power supply cables whilst the system is
in measure mode, but yet have a single central power/charge source. The output impedance of the signal amplifier
is sufficiently low to permit considerable cable length to be attached without significant distortion of the signal.
The system also permits the application of a Charge Injection Calibration signal when suitable microphones and
preamplifiers are used. (Charge Injection Calibration is a system of injecting a voltage via a low value capacitor
into the signal path at the condenser microphone input thus giving an indication of state of the entire measurement
system. This system was developed by Bruel & Kjaer and all due acknowledgments are given to them).
Suggested Accessories (available from main supplier)
[Return to Contents] [Top] UA0570 permanent
outdoor windscreen is used to restrict the wind noise during monitoring, 10dB reduction in noise is suggested by
Bruel & Kjaer.
[Return to Contents] [Top] The UA0393 rain
cover is also used to prevent rain, which may penetrate the wind screen, from coming in contact with the microphone.
Using this cover and windscreen fulfills the requirements of IEC651 for Type 1 Sound Level meters, with respect
to directivity.
[Return to Contents] [Top] The 4193 ½"
microphone operates with 200v polarisation giving a sensitivity of 12.5mV/Pa. The frequency response is considered
flat from 70mHz to 20kHz +/-2dB, these figures assume that the 2669 preamplifier, mentioned below, is used. (if
a better low frequency is required then the 4193 may be fitted with an adapter which will reduce the lower limiting
frequency to 10mHz with a 16dB reduction in sensitivity, 2mV/Pa)
[Return to Contents] [Top] The 2669 preamplifier
provides 200v polarisation voltage for the microphone operation. No signal conditioning is undertaken.
Operation
Head Unit[Return to Contents] [Top]
The head unit is made up of an external ABS box , an internal metal box, the main circuit board and a 12v battery.
The circuit board has a 200/28 volt switchable power supply (polarisation voltage), signal buffering amplifier
and two relays. The control signals for the relays comes via the control cable.
Relay 1 controls the powering of the main circuit board. In the un-energised state the internal battery is connected
to the 'charge' wires of the control cable. In the energised state the circuit is powered up by the internal battery
which is now disconnected from the charge wires.
Relay 2 connects and disconnects the 'calibration' signal, again supplied via the control cable.
The circuit board and battery are contained within a metal box, which provides electrolmagnetic screening of
the signal. This metal box has three sockets for connection of other pieces of equipment. (these sockets etc. can
be seen in the picture below) The smallest socket is the LEMO socket for connection to the Bruel & Kjaer 2669
preamplifier. The socket next to this is a BNC connector carrying the output signal. Finally the DIN connector
carries the control and calibration signals.
The metal box is housed in an ABS box which provides weather proofing. There is a shallow cable sut out in the
ABS box to allow the connected cables to exit the box safely. This cut out should be the lowest part of the box
when mounted for use to prevent ingress of rain etc.

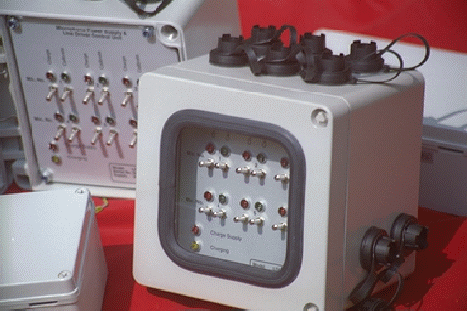
Control Box:[Return to Contents] [Top]
The control box contains a battery, charge circuit, control switches and connectors. The battery is used to
hold the relays in the head units in the correct position. The charge circuit controls the external 24v supply
to charge the control unit battery and via this the head unit batteries. The connectors connect to the head units,
an external 24v supply and an external calibration signal.
The six connectors seen below on the top of the box are the control cable connectors, one for each head unit
to be connected. The two on the right hand side are for the 24v external supply and the calibration signal. The
24v external supply may be DC or AC. If DC is used then the correct polarity should be observed to allow the correct
indicators to show on the control box. Polarity is marked on the connector.
Control Cable:[Return to Contents] [Top]
The control cables are 7 conductor screened cables. Screening is only required for protection of the calibration
signal if this is not to be used then any 7 core cable may be substituted. All other control signals are DC signals
and therefore are not effected by external interference. The signal current is low with the exception of the charge
current on switch on. This may be several amps for a very short time quickly falling to a maximum of 1 amp.
Connection[Return to Contents] [Top]
The Line Driver system may be made up from up to 6 line driver head units running from each control box. One
line driver head unit must be located at each microphone measuring point with the required microphone connected.
A control cable should be connected from the head unit to the control box. A signal cable should be connected from
the head unit to the recording device, BNC connector on head unit. The signal cable should be of high quality,
any figures given in this document refer to a signal cable made from URM76 or RG58 coaxial cable, the important
characteristic of the cable is the capacitance which for both of the above cables is quoted at 100pF/m, the lower
the figure the better.
This system will provide a basic short term measurement system but with no facility for charging. To prolong
the field life of the system a charge cable should be connected from the control box to a 24v AC or DC supply.
If this supply is made up from two 12v batteries in series, then consideration should be given to maintaining the
charge of these also. If a DC supply is used then the correct polarity should be observed. The Bulgin plus have
a + & - sign on the appropriate pin connections. If the wrong polarity is used NO damage
will occur but the 24v indicator on the control box will not illuminate correctly.
There is a BNC connector on the control unit to which may be connected a external calibration signal, this signal
should be removed during measurement to avoid any cross talk problems. This calibration signal is used to implement
the Bruel & Kjaer charge injection calibration system, which may be performed with the Bruel & Kjaer 4193/2669
microphone/preamplifier combination, (see Bruel & Kjaer documentation for explanation of this system).
Control Box Switches[Return to Contents]
[Top]
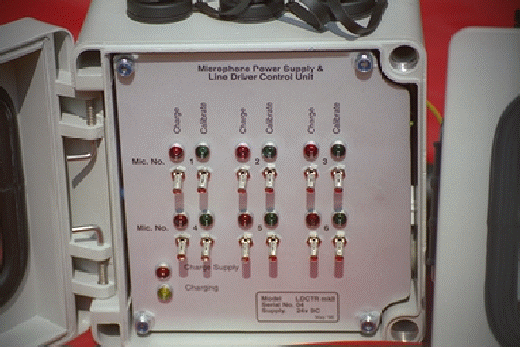
Each line driver head unit, has two toggle switches associated with it on the control box. (these are safety
switches which must be lifted before switching). The left switch applies charge to the head unit and the right
a calibration signal. To undertake calibration measurements a calibration signal must be applied to the control
box via the calibration socket next to the 24v DC socket. (see 'connections' previously)
When the head unit is unplugged from the control box it is automatically switched off to prevent unintentional
battery usage. When connected to the control box, the charge switch has the combined characteristic of switching
'ON' the head unit and providing charging power. These two conditions are mutually exclusive, therefore the unit
may not be used when in the charge position. The light above the charge switch indicates charge, ie. when the light
is 'ON', the head unit is being charged, when the 'Charge' light is 'OFF' then the head unit is powered up and
ready for use.
The calibration switch applies the calibration signal to the associated head unit when the light above the switch
is on. The calibration system is only intended for use with the Bruel & Kjaer 4193/2669 microphone/preamplifier
combination. To this end it is recommended that the operation of the Charge Injection system should be undertaken
following the reading of the Bruel & Kjaer instructions in the 2669 product data sheet.
Functioning[Return to Contents]
[Top]
Under normal operation, the line driver head unit is locally powered by the internal battery. By using local
internal batteries, long earth cables and possible earth loop problems are eliminated. The signal from the head
unit is driven down the signal cable to the recorder again with their own individual earth connections. Suitable
earthing arrangements should be made at the recorder termination. The control cable supplying charge & calibration
signals is isolated from the signal circuitry by a pair of relays in the head unit.
For prolonged installations an external 24v supply should be provided. This external supply will charge the
control battery and in turn charge the head units.
Battery charging[Return to Contents]
[Top]
All batteries used are sealed lead acid batteries. The batteries can withstand limited deep discharge as may
occur after prolonged shelf storage or usage. The batteries should be charged with appropriate chargers prior to
use. Under certain conditions where the batteries have not been used for some time it may take more than one charge
cycle to attain full working life of the battery. If unusually high noise or DC off set is noticed on the output
of one or more channels then a low battery should be suspected.
Under sever conditions the batteries may be replaced with similar ones. All batteries are 12v, the capacity
is not vitally important but the physical size should be such that the units can be securely reassembled. SEALED
BATTERIES SHOULD BE USED AT ALL TIMES.
Specification[Return to Contents]
[Top]
The ultimate frequency response of these line drivers will depend upon the microphones and preamplifiers used,
the figures given below assume the Bruel & Kjaer 4193/2669 combination.
Frequency limits: 70mHz to 20kHz +/-2dB (assuming 4193/2669)
Max output voltage: +/-13v (~150db SPL re 4193 sensitivity)
Signal cable length: 500m max SPL 146dB (4193/2669)
1km max SPL 158dB (4193/2669 plus UC0211 low freq Adaptor) (see below for further details)
Battery life: Head unit-8hrs+ on full charge
Control unit- depends upon charge of head units (if not used to charge then 24hrs+ could be expected)
Battery life can be severely reduced in adversetemperatures.
Signal Cable length [Return to Contents]
[Top]
The maximum length of cable which may be connected to the head unit is effected by the magnitude of the signal
it is carrying. The higher the signal the shorter the cable. If a very low signal level is expected then a longer
cable may be used. The figures given indicate the maximum cable length for a signal level close to the maximum
possible. If the level is halved then the cable length may be approximately doubled etc.
Size and Weights[Return to Contents]
[Top]
Head unit 235mm long, 140mm wide, 90mm high. 1kg
Control box 200mm wide, 200mm wide, 170mm high (exc. connectors) 3kg
Illustration of line driver mounting[Return
to Contents] [Top]
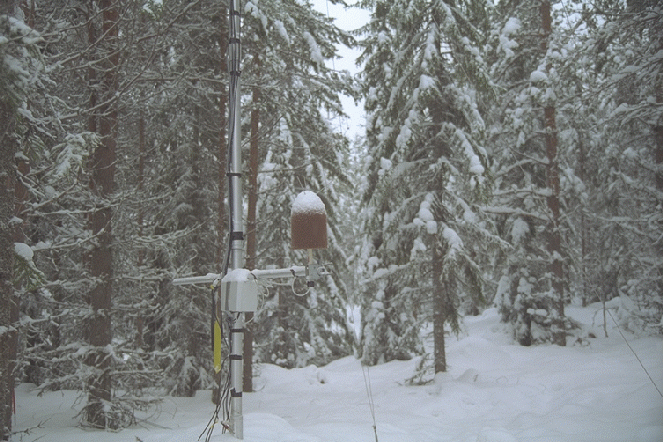
Line driver head unit seen strapped to a cross bar with the measurement microphone fastened at the end of same.
Here the units are in use in sub-zero temperatures and for a prolonged period. The control box has a 24V external
supply continuously connected and the head units were charged nightly.
Illustration of typical application[Return
to Contents] [Top]
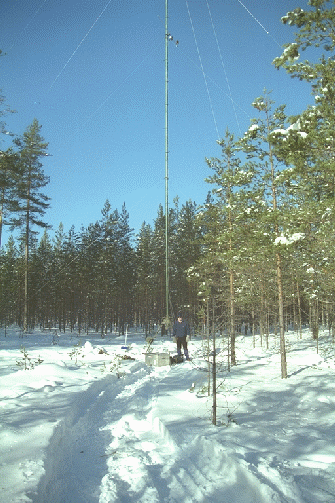
Line driver unit seen strapped 15m+ up a mast, this unit may be re-calibrated, re-charged etc without the need
to collapse/re-rig the mast.
Acknowledgments:[Return to Contents]
[Top]
The line driver system was developed for use with Bruel & Kjaer microphones and preamplifiers. All due acknowledgments
are given to Bruel & Kjaer for their products.
Design, development testing and production by
 David W Anderson
CEng
David W Anderson
CEng
Bridge Microphones
172 Wadsley Lane
Sheffield
S6 4EE
Tel. +44 114 285 6540
Fax. +44 87 00 94 00 57
Mobile +44 7774 782 503
e-mail david@bridgemics.co.uk
www.bridgemics.co.uk
The systems were developed for
The University of Salford
Department of Acoustics and Audio Engineering
Meadow Road
Salford
England
M5 4WT
Tel. +44 161 745 5000 ext 53030
Fax +44 161 745 5427
[Return to Homepage][Top]
